Browsing Category

House

House

Building a Home – Master Bathroom Reveal

I’m excited to show you our Master Bath today!  It is one area that always elicits some marvelous comments when we show people the house, mostly because the floor is unbelievable.

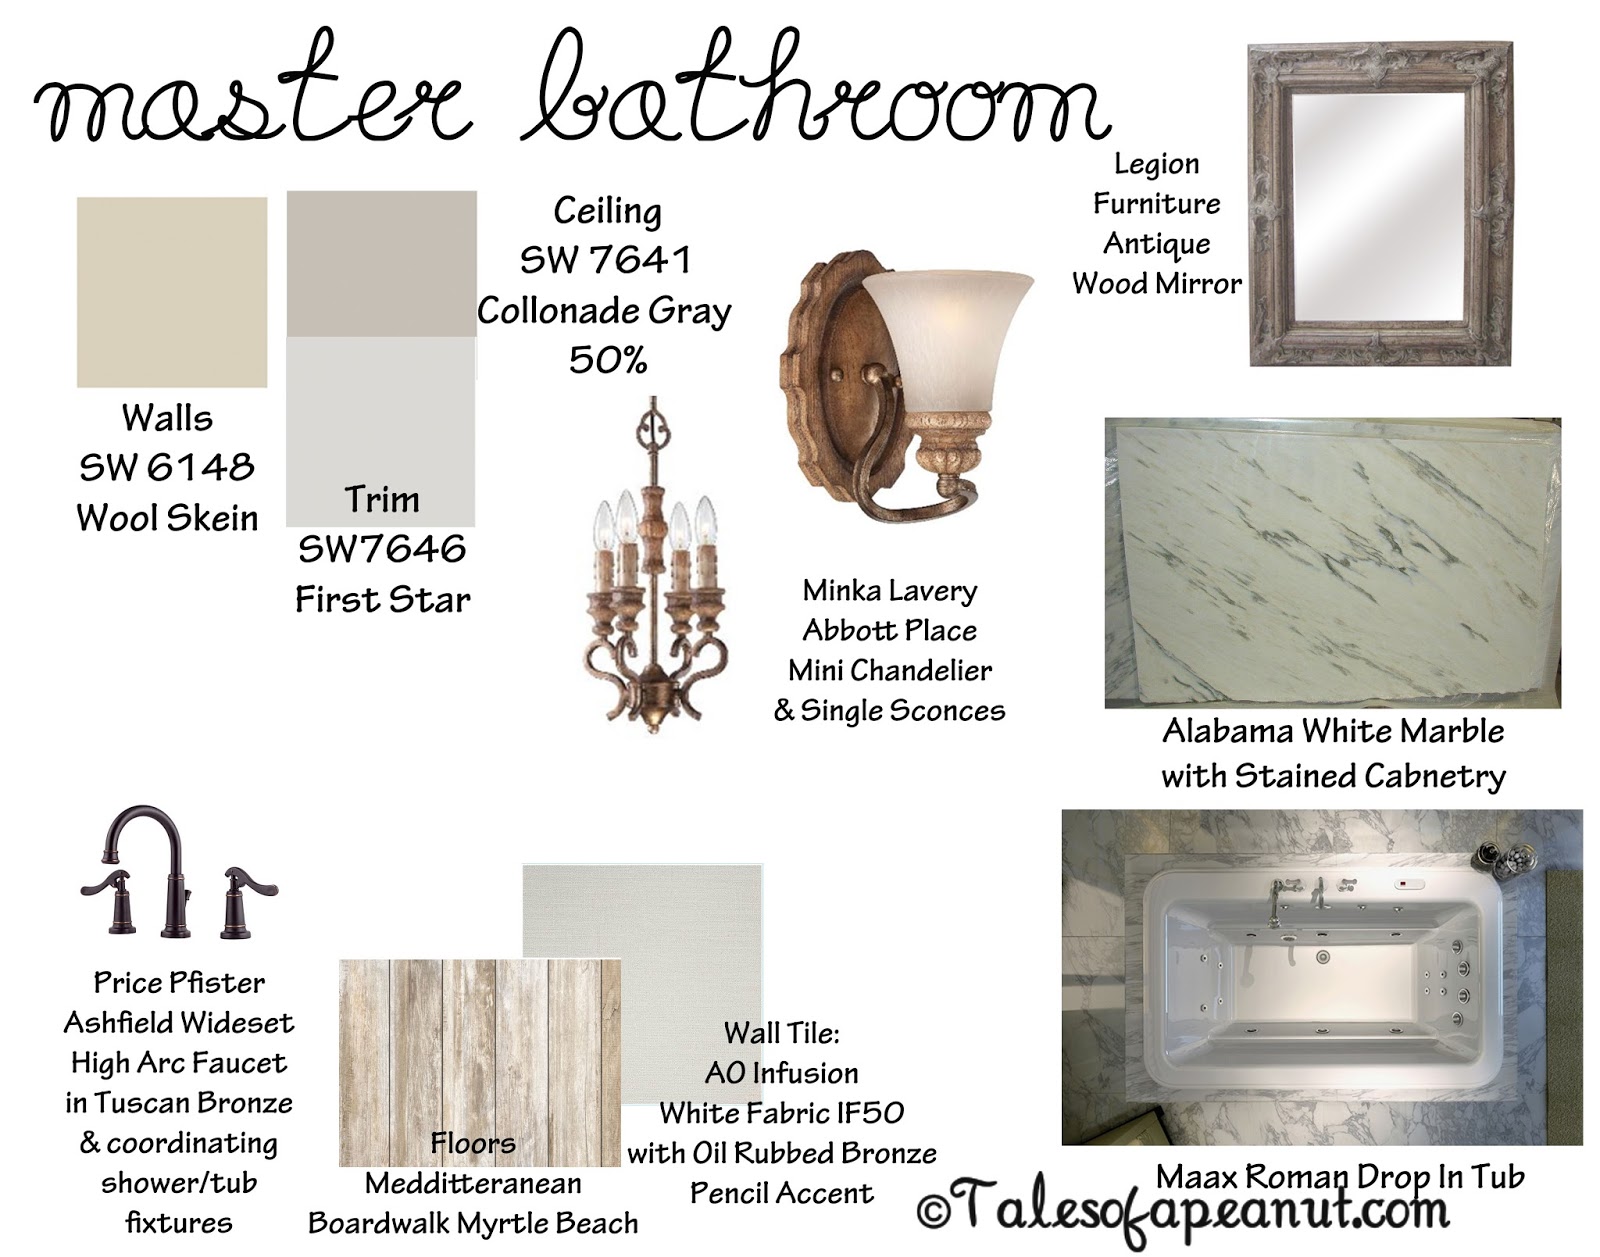
To get us started, I’ll show you the inspiration board again.  (And you can check out the master bath inspiration post here.)

You enter the master bath from the bedroom and immediately see our wall of cabinets.  We ended up with so many cabinets that even now (months from moving in) there are some that are empty.  The extra space will come in handy and be filled soon I’m sure but for now we’re just enjoying the extra space!

You can see that we’ve got his and hers sinks as well as a vanity in the middle and a linen closet tower on the far end.  We changed our cabinet drawings to a full height linen tower after we found the perfect slab of Alabama White marble to use but it wouldn’t fit if the counter went all the way from wall to wall.  Since we had taken out the architect’s proposed linen closet during the initial design phase, we decided to add in a cabinet linen closet to provide that space.  I have to say that I like the way that it turned out.

Our cabinets were custom made and we went with a very dark mocha stain on them.  We like the contrast between the cabinets and the white marble counters and the floors pull in some of all of the colors.

If you turn around standing in the middle of the vanity area, you’re faced with the tub and a wall of windows.  I love the natural light that comes in from these windows.  And, don’t worry, we’ve got shades that are motorized and come down from behind the valance.  They’re not see through but allow in a lot of light which is good, because they are closed a lot of the time.  (I’ve got a full post on the window treatments coming soon.)

To the left of the tub area is the walk in shower.  The tile that we chose for the walls is a really neat tile with a grasscloth like texture.  Even though it is a single color, the texture makes it very interesting and gives the wall some depth.

We used extra pieces of our marble slab to make a bench seat and shelves in the shower (as well as the top of the casing when you walk in the shower).  This allowed us to get the most use out of the slab as we could and I’m really happy with the look of the marble pieces in the shower.

Our master shower tile was the area of most contention in the entire house.  We had a misunderstanding with the tile guy and ended up having an order placed of tile that we didn’t fully know how much it was going to be.  We were able to return the really expensive stuff (with a restocking fee, of course) and our tile guy was able to suggest ways that we could use what we already had extra of to make the shower work.  The band of skinny tile halfway up the wall?  It’s actually the same 12×12 tiles that are on the rest of the wall, just mitered to appear like they’re individual skinny pieces.  And the shower floor is the same as the rest of the bathroom, just cut and laid in such a way to achieve the slope that was needed on the floor.  I LOVE the way it turned out and am very happy with the overall look.  The overall look of the bathroom ended up much more “rustic” this way as opposed to “glamorous” like it would have with the original tile accents, but I think this fits in with the rest of the house better.

Speaking of the floor tile, let me show you a close up.

I’m not sure if the feel of the tile comes off as well in pictures, but it is ceramic tile that looks 100% as if it’s weathered wood flooring.  Everyone who comes into our bathroom for a tour thinks that it’s actual hardwood and are always amazed when I tell them that it’s ceramic tile.  The shading and coloring and detail on the tile is amazing.  I promise you that you will not be disappointed if you put it in your house!  It looks fantastic and is tile so it’s virtually foolproof in maintenance.

To the right of the tub is the water closet, but I don’t think anyone wants to see that.  So I’ll move back around to my vanity area.

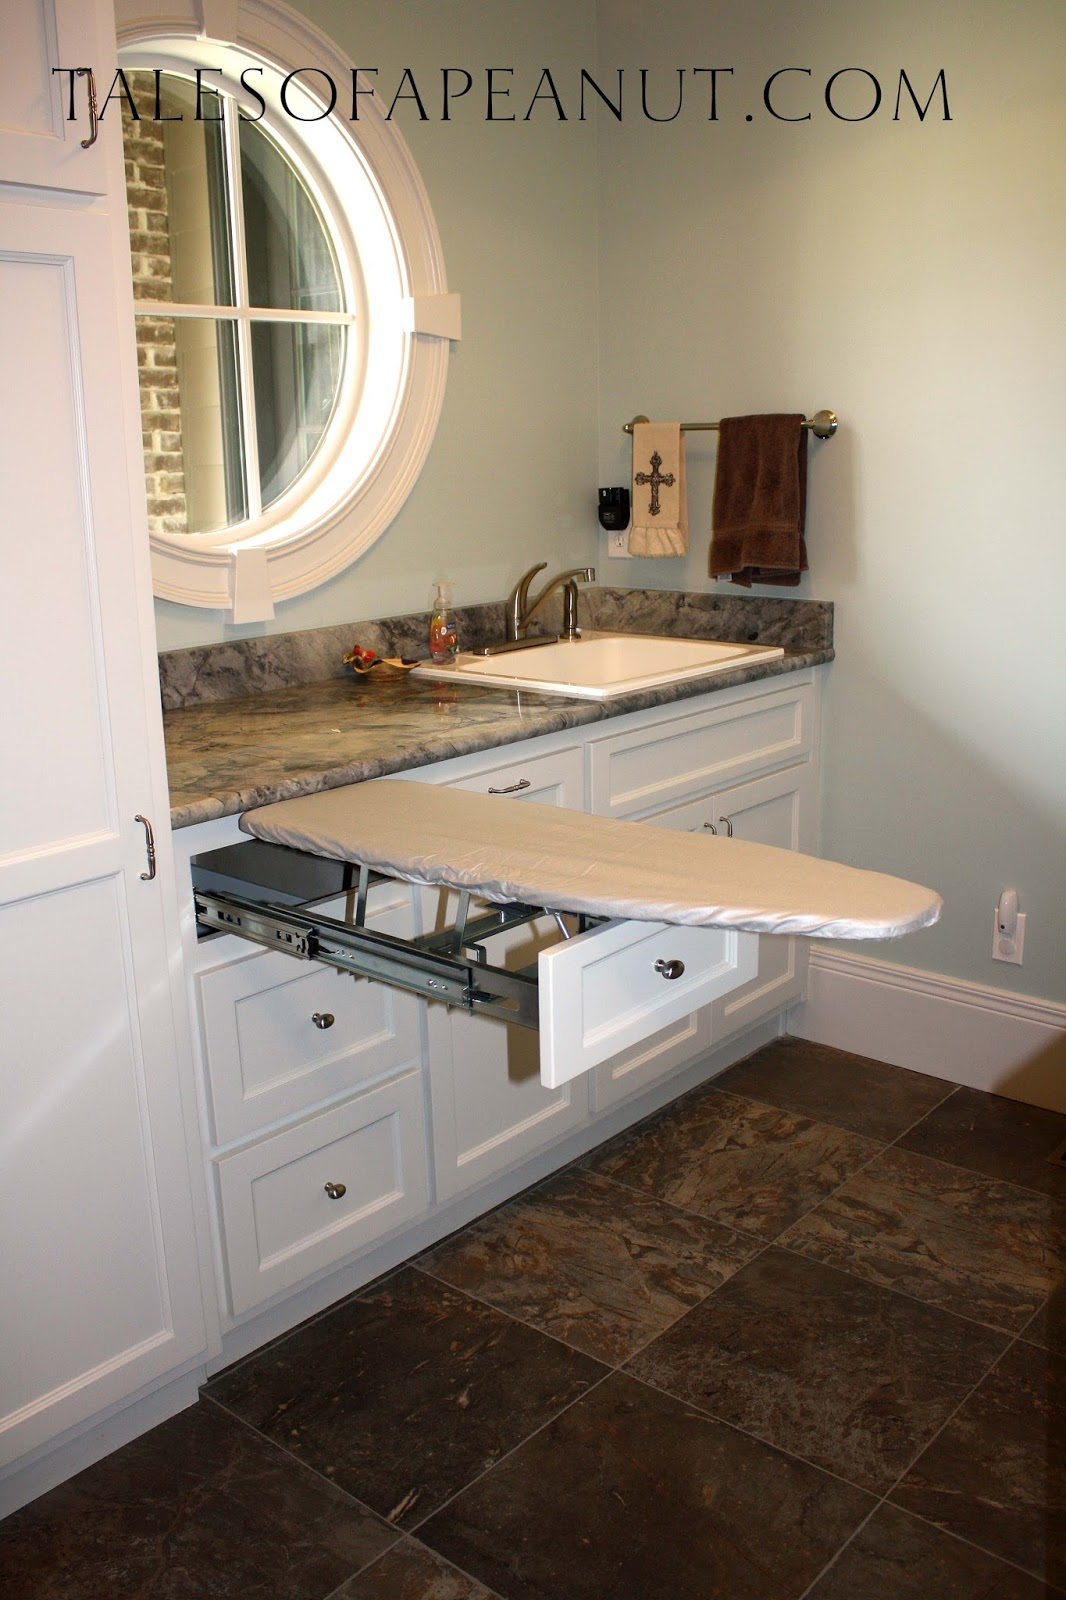
One of my favorite features of the house are the Rev-A-Shelf pull out’s that we installed here and in Charlotte’s vanity.  With a plug in the kneespace of the vanity, I’m able to keep my hair dryer plugged in all the time without it being an unsightly nuisance and I can stick my hot curling iron down in the metal bucket to cool if I need to get ready and then clear the counter quickly!

Some might wonder about the use of marble in the bathroom, but we’ve found it to work really well.  Since it’s in the bathroom I haven’t worried about sealing it with mineral oil (I know I should but I just haven’t had time!) and it still doesn’t hold water stains although we are careful not to set our contact cases straight on it.  It really looks beautiful and our stone people sold us on the fact that our honed finish is virtually indestructible and we know that the stone will just get a deep patina over time.  We like the look of the patina and the character it will add to an, otherwise, brand new house but if you’re interested in finding out whether marble is a good choice for you, this is a good article to read about the different ways it can be used and whether you should use it.

The veining of the Alabama White marble that we chose is beautiful and we love that it’s called Alabama White even though it’s mined in Tennessee and then shipped to Italy to be made into slabs and then shipped back.  It’s not inexpensive but by finding a small slab we were able to reduce our cost and use almost every square inch of the slab and by using remnants everywhere else in the house (with the exception of the kitchen) we ended up under our budgeted amount estimated from our builder (who said we would be way over if we used marble).

Jason really wanted a small tv in the bathroom so that he could watch sports without disturbing me when he’s getting ready in the morning’s.  so we put a small one in this corner that is only seen when you get in the bathroom and turn around.  I like that it’s out of sight and admit that I’ve used it once or twice while getting ready.

We love the lighting that we selected and it works perfectly with the mirrors that we got on Overstock.com.  I tell you, don’t pay full price for mirrors if you can help it.  They are expensive and a mirror is a mirror and once they’re hung you can’t tell a lick of difference!

We are so pleased with the way our bathroom turned out and are loving the look and feel of it!  For those who want more details, here are all the specifics.

Wall Color: Sherwin Williams Modern Gray SW7632
Ceiling Color: SW 6211 Rainwashed (different than inspiration board)
Trim color: Sherwin Williams First Star SW7646
Countertops: Alabama White Marble
Cabinets: Custom with dark mocha stain
Sink faucets: Pfister Ashfield Widespread Faucet, Tuscan Bronze
Tub faucet: Pfister Ashfield Two Handle Waterfall 3-Hole Roman Tub Trim, Tuscan Bronze
Tub: Maax Roman Roman 6842 Soaking Tub
Shower fixtures: Price Pfister Ashfield items including rain shower head (our supplier put this together for us)
Floor Tile: Mediterranea Boardwalk Myrtle Beach
Wall Tile: AO Infusion White Fabric
Wall Sconces: Minka Lavery 5201-290 Abbott Place Sconce
Ceiling Fixture: Minka Lavery 4206-290 Abbott Place
Mirrors: Antique Wood Traditional Rectangular Mirror
Grooming organizer (hair dryer pull out): Rev A Shelf Grooming Organizer
Stool in vanity: Joss and Main (can purchase through 7/3/13 from the Amory Home sale)

*Some affiliate links are used.  All links fall under my link/review disclosures.  All opinions are my own and I wasn’t compensated in any way for these opinions or given any of these items.

House

Building a Home – Study Reveal

I’ve blogged about our study fireplace in the past, but I wanted to show you the whole room.  This room isn’t getting used a whole lot right now other than a thoroughfare for the kids car races, but I expect it will get used a lot in the future.  And the doors and windows add a lot of light into the foyer which is nice.
Here’s the inspiration board.

The study has a cased opening to the right of the foyer (you can see it and the stairs on the far left of the first picture).  These pictures go around the room clockwise.

It’s not large, but the dark bookcases look great with the rich wall color.  It’s a very masculine room (Jason picked out most everything in here) and will be even more so when we get his golf prints that he got in Paris framed and hung between the windows.
Here are all the details:
Bookcase stain: Dark walnut (mixed by cabinet shop)
Floor: White Oak 3 1/4″ planks with dark walnut stain
Curtains: Lexington Patina valences (locally made)
House

Building a Home – Laundry Room Reveal

I’m slowly but (hopefully!) surely working on the house reveal. With two little one’s it takes an inordinate about of effort to get a room “picture worthy” and I don’t even have a real high standard for picture worthy!  My time is also occupied right now with my new shop which is wonderful, but cuts into my blogging time.  So, all that to say, here’s the laundry room!

So here’s the inspiration board (original post about it here).  My number 1 priority was getting a space just for Luca in the room.  Our architect wasn’t quite sure about our plans, but he drew it in and it turned out wonderful!  It took quite a bit of work on the cabinet side too to get it made.  I want to do an in depth post about how it works soon.

We also had our cabinet design guru draw out plans for the laundry room since it was going to be such a large space and I wanted it chock full of cabinets.  The cabinets that we got ended up matching her sketches almost exactly.

When you walk into the laundry room, the washer and dryer is on the left.  It’s topped with cabinets on the left where I store all my cleaning supplies (out of reach of the kids but within easy reach for me!) and a drying rod on the right.  One of the best parts is the stainless steel countertop which is fine to let items drip dry on top of and is so easy to clean up!

On the right is my beloved wrapping station as well as areas for the laundry baskets.  This hasn’t come in super handy yet since it’s not Christmas, but it is nice to have a place to store everything.  And the stainless counter on the other side is perfect for wrapping!

The back wall when you walk in is made up of cabinets surrounding the circular window.  It looks like I didn’t get a picture of the whole wall, but the left hand side is a full length hanging bar for drying pants, with the broom closet next to it, and then a White Vermont Granite counter with a basic drop in laundry sink.

And then facing the sink is Luca’s area.  The pictures don’t really do it justice (I have to do another post!) but it’s really neat and has been so nice to have!

And for anyone who wants to know the details, here they are!

Wall color: SW 6211 Rainwashed (different than inspiration board)
Trim color: SW 7646 First Star
Cabinet color: SW 7646 First Star
Faucet: Peerless P188500LF-SS Choice Single Handle Kitchen Faucet, Stainless
Sink: Drop in Laundry Tub
Washer: Whirlpool Duet Steam WFW95HEXL
Dryer: Whirlpool Steam Dryer WED95HEXL
Floor tile: Stonepeak Ceramics Fossil in Deep Sea
Granite counter: White Vermont (sometimes called Superwhite)
Counter over washer/dryer: Stainless steel, custom cut and built (very reasonable though!)
Light fixtures: Shades of Light Chevron Fabric Drum Shade Pendant in Spa Blue and Cream

House

Building a Home – Kitchen Banquette

Now to show you one of my favorite features of the house…the kitchen banquette!
When I was pulling pictures for the architect I found banquettes everywhere online and decided that, if possible, I really wanted one.  I figured that it would come in handy when the kids had friends over to eat and that it would be a comfy place for them to spread out when they needed help with their homework while I’m cooking dinner.  So Mark skillfully worked in a one sided banquette to our kitchen and I love how it turned out!
Here is the space sheet rocked.  The cutout portion on the left side of the picture is for the banquette. 
Mark just drew in an opening for the banquette and I was in charge of “designing” it.  I ended up doing a lot of research about banquettes and found that the forums at Garden Web provided lots of help in figuring out what dimensions we needed.
In case you’re interested in the mechanics of it, here’s the info.
– A standard seat depth is 18″ – 22″.  Ours is 22″ deep with about a 3″ upholstered backboard.  It is a little deep for Charlotte and I (I’m 5’4″) but should be able to accommodate James as he grows and his friends.
– A standard seat height is 18″.  Our wooden bench is 18″ tall with another 2″ on it for a cushion.  It’s a tad high but, again, should accommodate growing and adult men.
– Our banquette length is about 78″ long.  Our kitchen table is 72″ long.
Here is the base built out and primed.
At the same time the trim guys built out the seat, they also cut out a large piece of material to be given to the upholsterer for the back piece of the seat.  I stood with KC while he cut the board and helped get a curve on the top that I was happy with.  Our back piece was 36″ tall (so it’s top is about 56″ from the floor).  
We also had the guys build it with an empty interior and piano hinged doors so that we can store things under the cushion.  It is a pain to get in and out because we’ve got to move the cushion and the back piece is HEAVY, but since I’m just using it for off-season items it’s been fine so far.  KC tried to talk me into putting drawers or doors on the front of the banquette since they’d be a little easier to get to, but I knew that I would have to move the table either way and I prefer the solid face of the trim on the bench as opposed to it being broken up with doors or drawers.  (Plus, I figured having them custom make drawers would be much more expensive!)
So now, the finished product! (PS My new chairs still haven’t come in so please excuse the temporary ones!)

I am really enjoying this seat.  Charlotte and I sit on the banquette for meals and she likes scooching right up next to me to eat.  It’s comfy and we both sit with one of the pillows behind our backs for support.  When we’ve had parties here the banquette always fills up and we’ve had as many as five people (including Charlotte) eating on that side of the table at one time!

Getting in and out of the banquette is a tad of a challenge though since the banquette is recessed into the wall somewhat.  We made sure to get our table (review of it coming soon!) shorter than the space so that there’s room to slide into the bench, but without getting a table that’s significantly smaller than the opening it will still be a bit of a squeeze to get in.  If the ends were completely open that problem would be totally alleviated though.

For anyone wondering, the back piece is a piece of MDF (I think?) that was then padded and upholstered with fabric.  It is really HEAVY and is hung with a French Cleat that our builder bought at a big box home store.  It’s fairly easy to get on and off if needed and even though it’s heavy I have no concern that it’s going anywhere.  We made the cut wood about 3-4″ shorter than the opening in the wall to allow for upholstery.  It fits almost perfectly into the opening now.

We are loving our banquette and I anticipate us loving it for many years to come!

House

Building a Home – Mudroom Reveal

I’m obviously starting with chronicling the easiest places to clean up, make photo-ready, and photograph.  I’ve done the Kid’s Study area, the Powder Bath, and now The Mudroom.
This is one area that I have been thankful for over and over again since we moved in.  It has provided us with a place right next to our garage door to store our school tote bags, jackets, purses, shoes, and seasonal items.  Even though it can look cluttered at times, the closed shelves on the end provide me with ample space to stuff random items as needed to clean it up.
You can check out our inspiration for these areas in the original Mudroom Inspiration post.
These mudroom inspiration rooms combined some of my desires.  Individual cubby’s for family members, storage for shoes as we come in the house, and closed storage.  We had our architect include a space for built in cabinets and then had Valerie design an elevation for our cabinets.
Then we had our cabinet people design based off of that preliminary drawing.  We modified a few things (like the depth of the cubby’s and closed storage) and they built it and installed it.  And now, here it is!
Just to point out some of the features that we love about it…..

House

Building a Home – Powder Bath Reveal

I’m happy to report that I’m finally getting back to posting reveal pictures of our house.  They’ll probably be slow to come, but I’m trying to get them out, I promise!  First up, the powder bathroom downstairs!

I’ll remind you about some of my inspiration photos that I had for this room.  I wanted the room to be polished and warm with a little touch of glitz and glamour.

My favorite features were the sconce lighting, the beautiful and glamourous mirrors, and the beautiful counters.  This was reflected in my final inspiration board for the powder bath shown below.

And now for how it turned out in real life!

I love the serene feeling that you get in the bathroom.  I love the ample drawer space to place extra hand towels and toilet paper for guests.  And I love the mix of rustic (the mirror) and glitzy (the chrome fixtures).  I am so happy with how the room turned out!

Some details on how we pulled it off:
– We used remnant stone so we got it for a song
– Since our cabinets were custom made they were able to adjust for the narrow wall depth and bump out the sink area which I ended up loving the look of
– We made sure to place the toilet paper roll on the side without the floor vent after experience in our last house where the roll would unroll constantly any time the heat or air ran
– We had these cabinets glazed to give them a higher-quality look

Room Details:
Wall Color: SW 6211 Rainwashed
Flooring: 3 1/4″ white oak with a dark stain
Granite: White Vermont (aka Superwhite) remnant
Sink Fixture: Delta Linden Centerset Lavatory Faucet, Chrome
Mirror: Hobby Lobby (they still have them in store and are 50% off often!)
Cabinets: SW 7646 First Star (trim color) with dark gray glaze
Drawer pulls: Chrome Egg Cabinet Knobs (linked are similar)
Lighting: Artcraft Lighting Princeton Transitional Wall Sconce In Chrome With Silver Pleated Shade