Browsing Category

Kid Activities

Charlotte, Crafts, Kid Activities

Personalizing Wooden Initials


Painted Wood Monogram

Wooden initials are all the rage right now.  You can find them in home stores around town or online.  (My favorite place to purchase them is from Mint Julep Monograms because I know the owner and know that she’s awesome.)  I purchased Charlotte’s monogram last fall and finally, on her birthday, we got around to making them special for her.  I started out by painting them with leftover Collonade Gray that we had on hand in our garage.  I then let Charlotte pick out some glitter so that we could make them special.  She, of course, chose purple!

Needed MaterialsMod Podge in Bowl

I first covered a bowl with aluminum foil.  I didn’t have any disposable bowls and figured that this would make it easy to roll up into a ball and toss when we were finished.  (I do this with grease when cooking also.)  It worked perfectly.  I poured some mod podge into the foil.

Glitter in Mod Podge

I then let Charlotte dictate how much glitter to mix into the mod podge.  We ended up using maybe about a fourth of the glitter container.  It was a very fine glitter and so took a lot.  If I do this again and am looking for sparkles I will probably go for a larger grain of glitter so that it shows up better.

Charlotte Painting Initials

Charlotte and I then set to work painting.  We used some foam sponge brushes that we had in the house and set the monogram on half of Easter eggs to keep it from sticking to the desk.  This is our craft desk so I wasn’t worried about the mess on the table, but if you want to protect yours you will need to put wax paper or newspaper down to protect your surface.  We just painted the glitter/mod podge on fairly thickly and tried to cover all of the surfaces.

Close Up of Initials

Close up of the painted initials when they were still wet.

Drying initials

As the initials were drying.  It’s hard to see the glitter since it’s so fine but it is there and does reflect in person when the light is bright.

In room

After the initials dried we used a few strategically placed nails to hang them on her wall.  She loves them and especially loves that she got to pick out the accents and help paint them!

Charlotte, Kid Activities

Keeping Your Pre-Schooler Entertained – Kiwi Crate Review

Some days it’s like I’m SuperMom.  I’ve got activities planned.  I’ve got dinner made.  The laundry is clean.  The sink is empty.  And I’m full of energy to come up with new and exciting things for my kids to do (and learn while they’re doing it!).  And then….there are the other days, which, honestly, is most of them.  On those days I’m struggling to come up with something to do without sticking my kids in front of the tv all day or making them fend for themselves.  Those things are good in small(ish) doses but when that’s all I can offer all day, I begin to feel discouraged about my mothering abilities.

Enter…Kiwi Crate, one of my newest and most favorite finds!

At the beginning of the summer I was sent a crate to review and Charlotte received one for her birthday.  So one day this summer, when I was stretched for activities I pulled out the Kiwi Crate box and was overjoyed to find everything I needed within the box along with great instructions!

2013 05 29_0718 Web

First, we tried the “Busy with Bugs” crate which included materials to create your own firefly as well as make a bug sponge painting.  I was happy to see that each activity had an information sheet (shown below with the dolls) that gave an estimation on time it takes to complete, as well as parent interaction required.

2013 06 10_0725_edited-1 Web

The tiny sponges that you soaked in water to grow into big sponges made this activity even more exciting for Charlotte.  She had a blast creating her bug painting!

2013 06 09_0745_edited-1 Web

And if you can’t tell that she was excited making her firefly then you are missing something!  Just look at her face when we made her bug “fly” using the zipline that was provided!

2013 06 09_0763_edited-1 Web


We also spent some time making paper dolls and a fairy wand with the crate that Charlotte received for her birthday!  She is still (months later!) playing with her wand and her dolls!

2013 06 07_0448 Web

2013 06 07_0491 Web


We loved our Kiwi Crate’s and are happy to share them with you.  And if you decide to join Kiwi Crate (it’s a monthly service that you can buy a pre-set number of months at a time or purchase monthly) in the next two days you can save with their Back to School special!  Your child will start their subscription with September’s crate on Modern Art!

BTS_ad_728x90_R2

I’m thinking that this might be a perfect gift for Charlotte this Christmas!  If you’re not ready to make the decision to purchase a monthly subscription, why don’t you check out their FREE printables!  You can also purchase crate’s one at a time and they have a Celebration shop that has mini-crates, party favors, and travel crate’s!

What do you think about monthly subscription services like this?  Do you have any experiences with Kiwi Crate that you’d like to share?

*The “Busy with Bugs” crate was provided free for review to the site.  And there are affiliate links used in this post to support the site.  All opinions are my own and use of affiliate links does not increase your price in any way, it just helps to support Tales of a Peanut.  Check out my links/review disclosure page for more information.


Kid Activities

What to do over the summer?

I’m working on a summer schedule for our family to keep us occupied and engaged this summer instead of having to come up with something new to keep everyone happy each morning.  I’m hoping to share some of the things that we’re doing over the summer so that you can implement them into your summer routine if they fit your family.

I’m very excited to share one of the projects that I’m most excited about for this summer: Kiwi Crate!  I had heard about Kiwi Crate on Pinterest a while ago but hadn’t really checked it out.  I’ve recently connected with them and am so excited about sharing some of the fun things that they have going on!

Kiwi Crate is a crate of kids crafts and activities geared towards 3-7 year olds that’s delivered right to your front door.  You can either subscribe to the service and get a new crate every month (in 3-, 6-, and 12- month increments) or you can now purchase single crates for $19.95 to give you and your kids a single set of activities!  Here are a few of the single crates that I’m most interested in trying for our family!

Fairy Fun with Kiwi Crate! The perfect gift for kids ages 3-7. shop ››

Explore colors with Kiwi Crate! The perfect gift for kids ages 3-7. shop ››

Go exploring with Kiwi Crate! The perfect gift for kids ages 3-7. shop ››

Right now Charlotte (4) is interested in finding out why and how things work so I think these crates would be perfect to keep her interest for a long period of time (hours or possibly days if spread out) and keep her interested in learning over the summer!

In addition to these cool crates, when I went to look at the website in depth I found lots of other things that are AWESOME about Kiwi Crate!

They have party favors (or party activities) like this super cool Super Hero Cape or making a Fairy Wand!

Super hero cape - kids' party favor />>” border=”0″ src=”http://www.shareasale.com/image/39251/party-favor-300×250-03.jpg”></a></p>
<p><a href=Gorgeous Party Favors for Kid />>” border=”0″ src=”http://www.shareasale.com/image/39251/party-favor-300×250-04.jpg”></a></p>
<p>In addition, they also have an area with top quality kids craft materials for you to stock up on to ensure that your kids are learning and having fun with products that are fun and of good quality!</p>
<p><a href=Introducing DIY Ideas - Arts & Crafts Materials Store

They also have gift cards or gift crates that I’m thinking might be my new “go-to” birthday gift!  I hope my kids are as excited about these as I am because I am really giddy thinking about the possibilities!  Honestly, reading over this post I’ve got a lot of exclamation points and I promise they’re all genuine.  Trying to tone it down now.  🙂

And as an added bonus for the next few days, Kiwi Crate is part of a giveaway to make your Mother’s Day the happiest ever!  Enter this sweepstakes for a chance to win $250 each from Target, Nordstrom, Lululemon, and Anthropologie!  But make sure and enter soon because the contest closes on Sunday!
Win the Happiest Mother's Day Ever! $1000 on your favorite brands. Enter now ››

*This post falls under my Link/Review Disclosures and there are affiliate links in this post.  Any clicks and purchases that you make will result in support of this site.  But, I promise, all enthusiasm and opinions are my own!

Charlotte, Crafts, Kid Activities

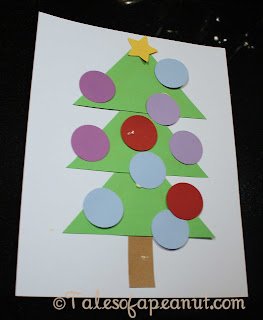
Christmas Tree Craft

For the Christmas party in Charlotte’s class, her teachers asked if one of the parents would lead the kids in a simple craft.  When no one else volunteered for it, I decided that I could probably handle it and so I volunteered for it.  Then began the painstaking process of finding something that was simple and not time-consuming, that could be done by three year olds with little to no help.

Pinterest is great, but it is not a great source of easy projects.  It was finally the weekend before her party and I still had no idea as to what I was going to do.  Then, I turned down the hall to take James to the nursery on Sunday at church and saw something similar to this craft and knew that it would be fun and easy and SIMPLE for the kids.  I’m sure that this idea is on the internet somewhere, but I haven’t found it yet.  If you know who I can credit the idea to, please let me know!

Cutout Christmas Trees

Immediacy of Results: Immediate
Prepwork needed: Yes, 30 min to an hour
Time required: 15 min
Materials needed:
White construction paper
Green construction paper
Brown construction paper
Yellow/Gold construction paper
Multi colored construction paper
Scissors/shape punchers (for prepwork)
Glue sticks (for kids)

Step 1: (Prepwork)
Cut out three triangles for each child from the green construction paper.
Cut out one brown “trunk” for each child from the brown construction paper.
Punch out one star for each child from the yellow/gold construction paper.
Punch out anywhere from 9+ balls for each child from the multi colored construction paper.
*Note: I used these kind of scrapbook punches from Hobby Lobby for the stars and balls.  They are AWESOME!
Step 2:
Distribute all materials to each kid.  They need the following:
1 piece white paper
3 green triangles
1 brown trunk
1 yellow star
9+ multi colored balls
1 Glue stick
Step 3:
Show the kids how to glue on their trunk and then glue on the pieces of the tree to the background paper.
Step 4:
Add the star to the top of the three

Step 5:
Let them go to town “decorating” their tree with ornaments!

Step 6:
Admire their handiwork!

Christmas, Gift Giving, Kid Activities

Posts of Christmas’ Past

Since it’s now December I thought I’d remind you of some Christmas posts from past years.

Let’s start with crafts involving kids.  I’ve added them to my Activities for Kids page but here are the links.

And for the grown-up’s.  Here’s the link to the Christmas Card holder that I made last year.
If you’re not into crafts but want to see the gifts that I’ve raved about over the years check out these posts.
Charlotte, Crafts, Kid Activities

Experiment Girl – Celery Painting

When I made Tomato Basil Parmesan soup a few weeks ago, the recipe called for chopped celery.  I just bought an entire celery stalk at the grocery store and when I cut the end off I remembered seeing somewhere that the end of a celery stalk would make a good stamp.  I tried a few paintings before she got out of bed and when she got up I set her up and let her go to town.  She could do this craft from start to finish by herself (other than pouring the paint) and she had fun making a painting for herself and one for Gramme.
Celery Painting

Immediacy of results: Immediate
Prepwork needed: Buying celery and cutting the end off
Time required: As much or as little as desired
Materials needed:
An end of a celery stalk
Paint
Plate to put the paint on to dip the celery into
Paper or canvas to paint on
Foam paintbrush (optional)

Step 1. Squeeze paint onto plate.  You can mix colors or just use one, whatever you want.
Step 2. Use the paintbrush to mix the colors and spread it evenly around the plate.
Step 3. Dip the celery into the paint, covering the flat surfaces.

Step 4. Stamp the celery onto the paper.  Repeat until you’re satisfied with your final painting.