Browsing Category

Crafts

Crafts

Solving the Pillowcase Problem

I don’t know about your kids, but mine have been sleeping on “Pillow Pets” since they turned one.  While Charlotte rotates through an assortment of pets and large babies, James sticks to one baseball pet.  The only problem with them sleeping on these pillows every night is….that they sleep on them every night!  And unless I’m a washing genie, it’s hard to get those big stuffed pillows washed, dried, and back in bed between time to get up in the morning and time for nap.  Which left my kiddo’s sleeping on pets that weren’t very appealing in between times that I could snatch to wash them, or had them crying at bedtime because their favorite pet wasn’t with them.
So a few weeks ago I was in Target and saw their travel pillows and thought that they would be the perfect size for my kids.  And, perhaps, if I could make cute pillowcases out of leftover fabric that I have, I could convince the kids to sleep on them!  Then I would just have to change pillowcases and wash them constantly and just wash the whole pillow occasionally instead of washing a whole pet all the time. 
Last week I finally decided to try the project and I have been so pleased at how it turned out I wanted to share it with you!  Without further ado…. How to Make A Travel Pillowcase!
Materials Needed:
Fabric – approximately 1 yard if making the whole case out of one fabric
Thread
Basic sewing supplies (needles, scissors, etc)
One Travel Pillow (this is the one I used)
Directions:
Note: I cut out a pattern out of some random fabric that I had but you could just measure out and mark on the individual fabric pieces before you cut.
Step 1. Cut out your fabric.  
If you’re using a travel pillowcase like the one above, you’ll need to cut out the following pieces:
2 – 16″ x 21.5″
1 – 16″ x 10.75″
Note: The above travel pillow is 14.5″ x 20″.  The general rule of thumb is to add 1″ around for the pillowcase and in this I added .5″ for the seam allowance.

Step 2. Fold down and pin a .5″ seam allowance on the long edge of the 16″ x 10.75″ piece.  This is the envelope enclosure for the pillow.

Step 3. Fold down and pin a seam allowance from between 1.5″ and 2″ on the short edge of one of the 16″ x 21.5″ pieces.  This will be the back piece of the pillow.

Step 4. Sew both pieces that you have pinned.
Step 5. Lay the two large pieces together with their right sides together.

Step 6. Lay the envelope piece on top of the back piece with the sewn edge going towards the middle of the pillow.  This will be placed with the envelope’s right side against the back piece for the pillow’s wrong side.  (See picture below in which I just added the envelope piece on top of what I had already laid out in the picture above.)  
Step 7. Pin these pieces together on all four sides.

Step 8.  Sew all four sides of the pillow without leaving any breaks.  Make sure to reinforce the edges where the envelope is laid on top of the back piece (shown below) and where the back piece’s sewn edge is attached to the front piece.  This will give you more wear out of the pillow as the seams won’t start to tear when you’re stuffing the pillow inside of the case.

Step 9 (Optional). Trim the extra fabric around the edges to reduce bulk inside of the case.  (You could also press the seams open if you want to be really fancy….I did not do that!)

Step 10. Turn the pillow right side out through the envelope opening! Voila! You have a pillowcase!

Let me know if you have any questions about the steps!  And please excuse all the wrinkled fabric, I chose to go the easy route and just wash the pillowcases to get the wrinkles out before putting them on my kids beds.  As I type, they’re both sleeping soundly on their new pillows and Charlotte has already switched out pillowcases once since we first made them!
– These pillowcases and fabrics were just things I found or had on hand.  I wasn’t given them or compensated for using them.
Crafts, House

Create It Thursday – Fabric Covered Bulletin Board

 A while ago I saw Emily Clark do a post on a huge memo board that she made for her son.  I knew that I wanted something to go on the “backsplash” of my desk in my office and thought that this would be a perfect solution!

So right before we moved in I headed to Lowe’s to buy some insulation sheathing.  Mine looked different than Emily’s did but I figured it didn’t matter (and it doesn’t).  I bought the cheapest one there and asked them to cut it to my measurements for my area for me.  While they looked at me kind of weird for buying insulation sheathing in ballet flats and asking them to cut it to a non-normal size, they did it with a smile!

Last week I finally got around to actually covering the sheathing with fabric.  If you remember from my office inspiration board the colors in the room were gray walls with pink and black fabrics.  So I went shopping through my piles of fabric and came up with a pink and white seersucker that would coordinate perfectly.  PLUS, I could probably get away without ironing it since it was seersucker.  That’s what I call I double win!
So I assembled my required items.  My insulation sheathing cut to my dimensions, a piece of scrap fabric that was able to cover the sheathing plus 3″+ on all sides, and a staple gun and extra staples.
I started by cutting my fabric to about 3″ on all sides of the sheathing.  If you’re short on fabric you can definitely do less, just make sure that the fabric can wrap to the back and that there’s enough fabric on the back to staple.

In a move that would make my engineering professors at college shudder, I never measured anything and just eyeballed the whole thing.  I started with one corner of the long end and put a staple in and then tried to keep the same seersucker stripe along the edge as I continued to staple one entire long side.  Is it perfect? Definitely not, but unless you come, sit, and stare at it for a while, you’re not ever going to notice!

After I did one long side, I flipped the board to get it to the right tautness.  Again, I picked a spot near the middle, make sure that I liked how the fabric was pulled along the front, and put in my first staple.  I again tried to keep the same seersucker line on the edge as I stapled down the other long side.  

When I got to the corners I decided to treat them as a present.  I tucked the corners in and stapled them down.  I did both corners on one end first.

After stapling the corners, I folded the end edges up and stapled along them.  I went back around my board to staple in any areas that I felt weren’t being held as tightly as others and then I was done!
I brought the board downstairs and wedged it into my space.  Since there are electrical outlets under the upper cabinets and since the board was the same size as my space, I didn’t secure the board, it’s just sitting on my desk.  If you are going to be hanging it, Emily suggested using monkey hooks.
I love the pop of color that it gives my office since the shade is up high.  And it is the perfect surface for tacking up inspirational pieces, pictures, and ideas that I come across.  Pins stick and hold in in perfectly!  And for less than $10 (since I used fabric and a staple gun that I already had), you can’t beat the price!

Today I’m linking up with Lamberts Lately for Create It Thursday.  Hop on over to her blog to check out some other great ideas!
Crafts, Holidays

Buddy Valentine’s

In case you’re looking for a last minute “happy” to send with your child to school on Thursday, I love how ours this year turned out! An “I’m so glad that you’re my buddy!” card with a Buddy Fruit attached!

Christmas, Crafts, Family

A List for Santa

This was the first year that Charlotte really made a list for Santa.  So I thought that I would like to remember what her list included each year.  I found a DIY ornament from MPix that I created a template for and put the picture of Charlotte and Santa on it along with her list.  I hope to make one of these for each of the kids each year (once James can make a list, of course)!  I love that it includes a picture of them with Santa as well as what they wanted.

Since I put together a template I thought I’d share it with you in case you want to make one of these yourself.  But I can’t figure out how to link the photoshop file so that you can download it.  So, if you’re interested in the .psd file, send me an email at talesofapeanut (at) gmail dot com and I’ll email it to you.  If you just want the .jpg file, feel free to download it below.  And, if anyone knows how to offer free downloads, please clue me in!  I’ve got some fun things that I want to share and want to know how to do them correctly!

Charlotte, Crafts, Kid Activities

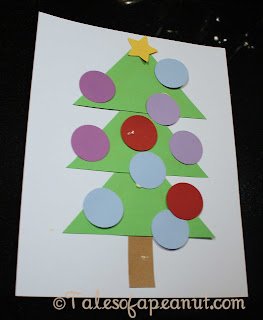
Christmas Tree Craft

For the Christmas party in Charlotte’s class, her teachers asked if one of the parents would lead the kids in a simple craft.  When no one else volunteered for it, I decided that I could probably handle it and so I volunteered for it.  Then began the painstaking process of finding something that was simple and not time-consuming, that could be done by three year olds with little to no help.

Pinterest is great, but it is not a great source of easy projects.  It was finally the weekend before her party and I still had no idea as to what I was going to do.  Then, I turned down the hall to take James to the nursery on Sunday at church and saw something similar to this craft and knew that it would be fun and easy and SIMPLE for the kids.  I’m sure that this idea is on the internet somewhere, but I haven’t found it yet.  If you know who I can credit the idea to, please let me know!

Cutout Christmas Trees

Immediacy of Results: Immediate
Prepwork needed: Yes, 30 min to an hour
Time required: 15 min
Materials needed:
White construction paper
Green construction paper
Brown construction paper
Yellow/Gold construction paper
Multi colored construction paper
Scissors/shape punchers (for prepwork)
Glue sticks (for kids)

Step 1: (Prepwork)
Cut out three triangles for each child from the green construction paper.
Cut out one brown “trunk” for each child from the brown construction paper.
Punch out one star for each child from the yellow/gold construction paper.
Punch out anywhere from 9+ balls for each child from the multi colored construction paper.
*Note: I used these kind of scrapbook punches from Hobby Lobby for the stars and balls.  They are AWESOME!
Step 2:
Distribute all materials to each kid.  They need the following:
1 piece white paper
3 green triangles
1 brown trunk
1 yellow star
9+ multi colored balls
1 Glue stick
Step 3:
Show the kids how to glue on their trunk and then glue on the pieces of the tree to the background paper.
Step 4:
Add the star to the top of the three

Step 5:
Let them go to town “decorating” their tree with ornaments!

Step 6:
Admire their handiwork!

Charlotte, Crafts, Kid Activities

Experiment Girl – Celery Painting

When I made Tomato Basil Parmesan soup a few weeks ago, the recipe called for chopped celery.  I just bought an entire celery stalk at the grocery store and when I cut the end off I remembered seeing somewhere that the end of a celery stalk would make a good stamp.  I tried a few paintings before she got out of bed and when she got up I set her up and let her go to town.  She could do this craft from start to finish by herself (other than pouring the paint) and she had fun making a painting for herself and one for Gramme.
Celery Painting

Immediacy of results: Immediate
Prepwork needed: Buying celery and cutting the end off
Time required: As much or as little as desired
Materials needed:
An end of a celery stalk
Paint
Plate to put the paint on to dip the celery into
Paper or canvas to paint on
Foam paintbrush (optional)

Step 1. Squeeze paint onto plate.  You can mix colors or just use one, whatever you want.
Step 2. Use the paintbrush to mix the colors and spread it evenly around the plate.
Step 3. Dip the celery into the paint, covering the flat surfaces.

Step 4. Stamp the celery onto the paper.  Repeat until you’re satisfied with your final painting.