Browsing Category

Crafts

Crafts, Kid Activities

Experiment Girl – Monoprints

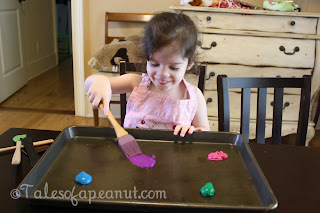
This experiment is the opposite of the no-mess finger painting that I posted about yesterday.  This one is all about getting messy and the messier the better!  This is another experiment from Play Create Explore.  I still am not really sure where the “monoprint” name comes from and don’t have the time or desire to look it up, but that’s what she called it so I’m sticking with it.

Charlotte loved getting messy but didn’t really enjoy making the monoprints like were shown in the original post.  She preferred to make handprints on paper instead which I was all for since I don’t have any recent handprints.  The clean up was pretty easy considering the mess that this made.  I just stuck the cookie sheet in the sink and let it rinse all the paint off while I cleaned Charlotte’s hands!

Monoprints

Immediacy of results: Immediate
Prepwork needed: None other than getting supplies
Time required: Any
Materials Needed:
Cookie sheet
Washable paint
Construction paper
Anything that you want your child to play with in the paint
Step 1. Put some paint on a cookie sheet and let your child move it around with any tools that you want to give them.

Step 2. Once the paint has been spread around.  Put a piece of construction paper on the paint and have your child press down.

Step 3. Pull the paper off of the paint and you have a monoprint!

Step 4. Then let your child explore with the paint and make whatever kind of art she wants!

Crafts, Kid Activities

Experiment Girl – No Mess Finger Painting

I had seen this around the internet but don’t have a specific link.  This is a super easy, no mess project that I thought Charlotte would love but she wasn’t interested in a craft on the day that we tried it and it fell flat.  I’ll probably try it again on a day when she’s in a better mood.

No Mess Finger Painting
 
Immediacy of results: Immediate
Prepwork Needed: None other than getting materials
Time required: less than 15 minutes

Materials Needed:
Large plastic bags
Construction paper
Tape
Paint

Step 1. Put construction paper in plastic bags.

Step 2. Squeeze paint on construction paper and seal bags.

Step 3. Use tape to secure bags to table.
This step is optional but helps your child be able to “paint” with both hands as opposed to using one to keep the bag still.
Step 4. Let your child go wild smushing and drawing in the paint that’s contained in the bag.
It was a little difficult to get the paper out of the bag so if you want to save the painting this might not be the best activity or you might want to use less paint.  But this would be a great way to keep your child occupied or practice writing letters or numbers or drawing.  If would also possibly be a good thing to occupy your child in a car on a long car ride.  But if you’re using it in that way I would probably double bag the paper and paint because if you smushed hard agains the corners of the zipper some paint did ooze out of our bags.
————————————————————-
As a sidenote, I added a tab at the top of the blog for ‘Activities for Kids’.  If has a picture and name of all of the activities that I’ve blogged as well as a link to the post about it.  I will be updating it as posts get published.
Charlotte, Crafts, Kid Activities

Experiment Girl – Smush Paintings

When Charlotte asked for an art experiment as opposed to the science experiment that I had planned for that day I went with the easiest thing that I could think of and made up a catchy name for it.  Thus became Charlotte’s favorite experiment so far…. Smush Paintings!

Smush Paintings

Immediacy of results: Immediate
Prepwork needed: None other than getting materials
Time required: 5+ minutes
Materials Needed:
Construction Paper
Paint
Step 1. Let your child select construction paper and paint colors and match them as desired.
And just in case you are wondering, this is the face of a little girl who is tired of her Mommy photographing everything they do for the blog.  🙂
 
Step 2. Fold construction paper in half  and then unfold.  Put blobs of paint on one side.  (This leads to a good counting activity of counting how many blobs are on the paper.)

Step 3. Fold construction back in half and let your child “smash” it together.  They should move their hands and fingers all over the construction paper to move the paint around.  They can also draw letters or shapes in the painting with their fingers.

Step 4. Marvel at your handiwork!

This is a really easy, no mess project to do.  Some things to think about though is that you want enough paint so that it smushed together on the construction paper but not enough that it’s going to ooze out the sides of the paper while your child is smushing.
Charlotte, Crafts, Kid Activities

Experiment Girl – Melting Crayons on Rocks

The execution of this experiment was a little flawed but we still enjoyed doing it so I wanted to share how you can do it BETTER than we did!

Melting Crayons on Rocks

Immediacy of results: Delayed
Prepwork needed: None other than getting materials
Time required: All day
Materials needed:
Flat rocks
Crayon pieces
Step 1. Find broken crayon pieces around your house and let your child pick out the colors that they want to melt.
* Skinny Crayola crayons work best.  Our experiment didn’t work that great because we used a mixture of crayon types and only the skinny Crayola’s melted really well.

Step 2.  Let your child arrange the crayon pieces on the flat(ish) rocks.
* We put our rocks on a piece of aluminum foil because I thought it might help get the crayons hotter and I also didn’t want to have to scrape dried crayon off of our driveway before the next buyer came to look at the house.  Next time I’ll use a cookie sheet instead of transportability.

Step 3. Admire your handiwork!

Step 4. Leave your rocks in the sun all day and check on them periodically to see how melted the crayons are!
* We had to move our rocks around to the front of our house in the afternoon to keep them in the sun.
This is another color combining experiment if you use the right kinds of crayons and let them get hot enough.  You can also discuss temperature and state of matter (solid, liquid, gas) with this experiment. 
I think this would also work in a low temperature oven and Play Create Explore has a version of melting crayons on a hot plate.

Charlotte, Crafts, Kid Activities

Experiment Girl – Marble Paintings

Another fun “experiment” that we did this summer was Marble Painting.  I remember making art like this when I was little and, just as I suspected, Charlotte loved it!  There are many ways to do this using whatever you have on hand but following is what we used.

Marble Painting


Immediacy of results: Immediate
Prepwork needed: None other than getting materials
Time required: 15+ minutes

Materials needed:
Marbles (or inexpensive craft/jewelry beads like we used)
Paint
Construction Paper
A box/baking pan — something to do the craft in
Step 1. Put the construction paper in your box with the marbles.
* I used a box that we had on hand that closed easily.  I liked that I could close it so that we could shake the marbles around easier (our beads weren’t very heavy and so sometimes got stuck in the paint).  But if you want to be able to see all of the painting you’ll need something with a bigger lip.  The example at Play Create Explore used a clear plastic bin which I think would be a good idea, especially with younger children who don’t have the hand/eye coordination to keep marbles from bouncing around.
Step 2. Drop paint in blobs around your construction paper.
Step 3. Shake! Shake! Shake! 


There are lots of things that you can talk about with your kids in this experiment.  You can discuss mixing colors to make other colors.  You can discuss gravity and how the marbles roll down the paper against the paint when the box is tilted.  You can discuss how the marbles make different paint shapes depending on which way you shake the box.  But mostly you can just have fun!
Crafts, Entertaining

Charlotte’s Birthday – Decorations and Favors

When we first started talking about Charlotte’s birthday party months ago she said that she wanted to have a bouncy slide.  We asked her if she wanted to have her party at the inflatable place in town and she told us that she wanted to have it at Memma and Papa’s house.  After getting approval from them we moved on to a theme.  At first Charlotte said that she wanted a cupcake party.  But a week or two later she said that she wanted a Minnie Mouse party.  So we rolled those together and added her favorite color and created a purple birthday party with Minnie and cupcakes!
We set up tables for the kids to eat cupcakes on the patio area.  I got balloons from our local party store with purple weights to weigh them down.  But it turned out that the day was too windy for the weights to keep them down so we cut some of Mom’s hydrangea’s and put them in cases to hold the balloons down.

From the beginning Charlotte requested cupcakes with purple icing.  So that’s what she got!  We served these purple cupcakes on Minnie plates with Minnie napkins and cups.  Charlotte also requested cherry lemonade so we had some of that along with regular lemonade, water, and Arnold Palmer’s (half lemonade, half sweet tea).
When I was trying to decide if we should have a small cake with the cupcakes I looked up Minnie cakes on Pinterest.  I was letting Charlotte look through them to see if she liked any (she didn’t, she stuck with purple cupcakes) she saw some cake pops and after asking what they were decided that she needed some cake pops at her birthday party.  After that if you asked her what she wanted for her birthday all she said was “Cake Pops!”
I didn’t think it would be hard to find a bakery who makes them but I was wrong!  I had gotten some recommendations from Facebook but the places I tried from those suggestions either didn’t make them anymore or there was some confusion.  I finally found a bakery in our hometown to make them and KayKay and GrandDavid were nice enough to pick them up for us!  Funnily enough, Charlotte didn’t even eat her cake pop (they were actually balls without sticks but that was the best I could do!) until two days after her party!  But she did enjoy it then!

We decided instead of just getting a bouncy slide to get a bounce house with a slide.  This was the perfect decision because the kids had so much fun!  We used a local rental place and they were fantastic.  They even brought it and set it up early that morning because they had free time so we got lots of extra play time!

For favors, I made play dough in fun colors (pink, purple, red, green, and blue) and put them in bags for the kids to take home.  I used this recipe from How Does She.  I hadn’t ever made play dough before but this was really easy (and gave me an arm workout stirring it on the stove!).  The dough is still really soft and feels great.  I will probably make this recipe again when I make more.  I made a recipe of each color and found that I could get about 10 silver dollar sized balls from one recipe.  So if you’re making it for favors keep that in mind.
I worked hard on these and stressed about them that I would have enough for the kids that hadn’t replied but might show up.  And in the end I walked back inside after the party and realized that I forgot to hand them out at all!  I didn’t want them to melt in the heat outside so I left them inside and they didn’t even cross my mind when people started leaving!  Oh well! I’ve run some around to the neighborhood kids but if you leave out of our neighborhood and came to the party I owe you some play dough!