Browsing Category

House

Crafts, House

Create It Thursday – Fabric Covered Bulletin Board

 A while ago I saw Emily Clark do a post on a huge memo board that she made for her son.  I knew that I wanted something to go on the “backsplash” of my desk in my office and thought that this would be a perfect solution!

So right before we moved in I headed to Lowe’s to buy some insulation sheathing.  Mine looked different than Emily’s did but I figured it didn’t matter (and it doesn’t).  I bought the cheapest one there and asked them to cut it to my measurements for my area for me.  While they looked at me kind of weird for buying insulation sheathing in ballet flats and asking them to cut it to a non-normal size, they did it with a smile!

Last week I finally got around to actually covering the sheathing with fabric.  If you remember from my office inspiration board the colors in the room were gray walls with pink and black fabrics.  So I went shopping through my piles of fabric and came up with a pink and white seersucker that would coordinate perfectly.  PLUS, I could probably get away without ironing it since it was seersucker.  That’s what I call I double win!
So I assembled my required items.  My insulation sheathing cut to my dimensions, a piece of scrap fabric that was able to cover the sheathing plus 3″+ on all sides, and a staple gun and extra staples.
I started by cutting my fabric to about 3″ on all sides of the sheathing.  If you’re short on fabric you can definitely do less, just make sure that the fabric can wrap to the back and that there’s enough fabric on the back to staple.

In a move that would make my engineering professors at college shudder, I never measured anything and just eyeballed the whole thing.  I started with one corner of the long end and put a staple in and then tried to keep the same seersucker stripe along the edge as I continued to staple one entire long side.  Is it perfect? Definitely not, but unless you come, sit, and stare at it for a while, you’re not ever going to notice!

After I did one long side, I flipped the board to get it to the right tautness.  Again, I picked a spot near the middle, make sure that I liked how the fabric was pulled along the front, and put in my first staple.  I again tried to keep the same seersucker line on the edge as I stapled down the other long side.  

When I got to the corners I decided to treat them as a present.  I tucked the corners in and stapled them down.  I did both corners on one end first.

After stapling the corners, I folded the end edges up and stapled along them.  I went back around my board to staple in any areas that I felt weren’t being held as tightly as others and then I was done!
I brought the board downstairs and wedged it into my space.  Since there are electrical outlets under the upper cabinets and since the board was the same size as my space, I didn’t secure the board, it’s just sitting on my desk.  If you are going to be hanging it, Emily suggested using monkey hooks.
I love the pop of color that it gives my office since the shade is up high.  And it is the perfect surface for tacking up inspirational pieces, pictures, and ideas that I come across.  Pins stick and hold in in perfectly!  And for less than $10 (since I used fabric and a staple gun that I already had), you can’t beat the price!

Today I’m linking up with Lamberts Lately for Create It Thursday.  Hop on over to her blog to check out some other great ideas!
House

Displaying Photos of Your Children


Ever since our first session with Erin Cobb, I have been dreaming of gallery walls of pictures of our family.  Over the past few years these walls have transformed and I wanted to share what we’ve done along with a sample for what sizes we hung in case any of you are looking for gallery wall ideas.  Without fail, our gallery walls are our number one most commented on item in our house.  Every single person who walks in is blown away by them and I absolutely adore having pictures of our family and our children on our walls.  Here are our gallery wall iterations!

GALLERY WALL 1:
6 pictures
1 30×30
1 20×30
4 14×14
All spacing is 2″ apart
All canvases are 2″ deep

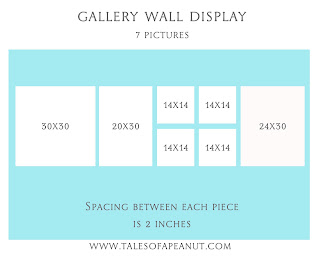
GALLERY WALL 2:
7 Pictures
1 30×30
1 20×30
4 14×14
1 24×30
All spacing is 2″ apart
All canvases are 2″ deep

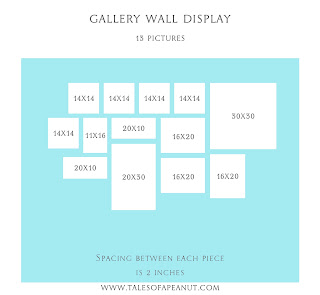
GALLERY WALL 3:
1 30×30
5 14×14
1 20×30
2 20×10
3 16×20
(actual picture is missing one 20×10 that I haven’t been able to locate at the new house, but it’s included in the second template)

One thing that gives these gallery walls such a big punch is that all the pictures were taken by a professional.  But they’re set in different places and with different color tones so I definitely don’t think they all have to be professional pictures.  As you can imagine, I don’t even want to contemplate the amount of money that we have spent on these walls over the years, and it would be much less expensive to intersperse quality pictures that you take along with professional photos.
You’ll also notice in the largest gallery wall that it isn’t all 2″ deep canvases.  I’ve mixed in some storyboards that are about 1″ thick.  In a strictly symmetrical gallery display it would probably look best for everything to be the same depth (and have the same edge color if the picture doesn’t wrap the edges).  But in an organic display different depths or edge colors blend perfectly.  Our large wall is a make up of canvases that we have transitioned out of the main gallery wall, canvases that we got to match another (for instance, one of each of the kids running at 18 months and one of each of the kids sleeping at newborn), and storyboards.
I don’t think you’ll ever regret making a huge statement about your family on your walls.  And I love the look of pictures that chronicle our lives.  I will keep adding and changing them out as the kids get older and we get more and I’m sure they will bleed over to other areas soon enough.  In the stairway I will probably try and incorporate things other than just pictures like artwork by the kids, initials, or other things.  Hopefully these will inspire you to create your own gallery wall!
House

Building a Home – Pantry


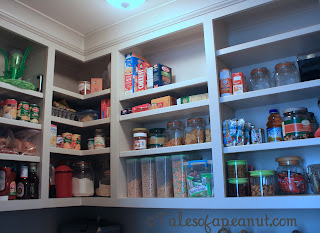
I had high hopes for an organized pantry in this house.  And even though ours ended up smaller than imagined, I am still amazed at how some simple foresight into design has made a huge difference in how I feel about it.  We have room to spare in our new pantry and I feel like I know where everything is (even if Jason still doesn’t yet) and everything has a place.

In looking back on the pantry workflow I found that most of the pantry’s that I was coveting the most aren’t on my Pinterest Pantry board.  That must mean that I pulled them from magazines.  (While Pinterest is handy, I found that making an actual 3 ring binder with magazine clippings was easier to convey my ideas to builders and subs that we worked with.)
I had my cabinet designer, Valerie, design a pantry that was beautiful.  It was gorgeous and I was so excited about it.  But then a small error was made when the pantry walls were poured (they’re concrete to make it a safe area in a storm) and the pantry shrunk in size.  Therefore, the awesome design that we already had needed to be scrapped for something simpler.  This honestly turned out to be a blessing because it saved us a ton of money and we still have lots of space in our pantry and tons of storage throughout the house for other things.
Once we got the final measurements determined, I sat down with our cabinet company and we worked up a plan for the pantry.  I wanted cabinets on the bottom half to keep our dog out of food and to not leave lots of space un-utilized like I felt we had in our old house.  But I didn’t want the cabinets to go on all walls so that there would be space to “take cover” in case of a tornado.  I also wanted a counter top so that I could place large appliances on it and shelves above that would be adjustable.
I’m very pleased with the way the pantry turned out.  I actually forgot that I had drawers the first time I tried to organize it and realized that they would be a perfect place for my extra “party” silverware.  We’ve also got kids foods like oatmeal and mac and cheese hidden in the drawers.
I was able to organize the pantry even more with lots of glass and plastic canisters that I found on Joss and Main.  I found that it was a great way to gets lots of containers to store flour, rice, cereal, etc in at much less than just buying them from Target.  
We’re still getting used to the pantry and will probably re-organize it a handful of other times before I’m totally satisfied with it.  But for right now the lack of product boxes, the ability to see what we have, and the clean lines of the space make me happy and very thankful that we went with a custom cabinetry pantry that looks like this rather than saving just a little bit of money for a pantry full of shelving.
House

Building a Home – Kid’s Study

One of the easiest places to photograph in it’s (mostly) complete form is the Kids’ Study area.  I blogged about my goals for this kid’s study space back in August and I’m now here to show you how it turned out.  
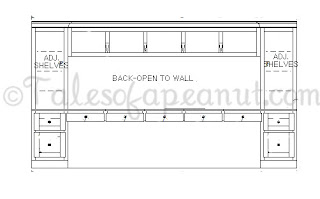
I went to our cabinet designer with this rough vision (horribly drawn, I know).  Some things that you’ll notice here that I went in saying I wanted were (a) vertical end cabinets with adjustable shelves; (b) horizontal cabinets above an open area; (c) a large open space for our kids to work that would also allow their friends to join them to work on projects; (d) drawers that would work as filing cabinets if needed.
We ended up with this elevation and I was very happy with it.  We ended up extending the center open space to keep it looking symmetrical and clean.  Since this area is open to the foyer and can be seen from the front door, we want to keep it as unobtrusive as possible, while also allowing it to be very useful for our family.  
Here is the Kid’s Study as it sits now.  These are temporary chairs, I have plans to put a bulletin board of some kind on the back wall, and some of the shelves are still just stuffed with stuff, but who knows when this will actually be 100% complete so I might as well show it as it is now!

I was afraid that we wouldn’t get much use out of this area for a while but we’ve found that it’s the perfect place for Charlotte to play with items that need to be kept out of James’ reach.  She loves coloring up here and we put the mat from one of her Busy Book’s under the plexi so that she can play with the small pieces while they’re out of James’ reach.  This space is getting a lot of use already!

Some of the features of this space that I really love are….


– That we have two ethernet ports and two sets of double plugs in the wall.  These ethernet ports are hardwired to our network so allow for a quick hardwired connection when needed.  And with eight plugs I would hope that the kids and any of their friends that are studying over will have all the electrical options that they need! 

– The bottom drawers on each side are the right size to fit with hanging file organization systems if the kids are any bit as organized as their parents.  Until then they just serve as extra deep drawers to keep stacks of construction paper and craft supplies.

– I got two pieces of plexiglass cut at Lowe’s to put on top of the wooden desk surface.  This has already been so nice since it is easy to clean crayon off of plexi and is great at flattening out Busy Board’s.

And for a little design information.  The color of the walls in this area (and he entire foyer) is SW 6205 Comfort Gray and the trim and cabinets are SW 7646 First Star.

House

Building a Home – Cast Stone Mantel

*Updated on 4/12/13 to include information at the bottom about the bricks inside the hearth.
Since I’m still not ready to show detailed pictures of every room of our new house (I’m working on them, I promise!), I thought I’d start with some cool features and resources that we came across.  One of the neatest, I think, is our cast stone mantel.
While we were looking through tons of home magazines and being watchful for ideas that we came across in our everyday life, Jason and I fell in love with the idea of a limestone fireplace.  You can see some examples of what we loved on Houzz here, here, and here.  We felt like a fireplace of this style would work well in our French Eclectic home and would help give the library/office a more masculine feel.
However, after looking at our budget and talking with our builder, we quickly found that we were definitely not going to be able to afford a real limestone fireplace.  So we started looking and researching some other resources where we might be able to find a cast stone fireplace that looked like limestone but at a fraction of the cost.
We were relieved to hear from our builder that he had just put a cast stone mantel in another client’s house and that it looked and felt and sounded great.  The unlikely source (in my mind) for this great, cost effective cast stone mantel? Mantels Direct
We looked through their products and decided to go with the York Majestic Series Stone Fireplace Mantel in Natural.  We felt like it fit best with the feel of our house and so we let our builder handle the ordering process.  Since the fireplace was custom sized for our house, and our builder handled all the details, we were hopeful that we would get a perfect looking fireplace that was just what we wanted but at a fraction of the cost of a real stone fireplace!

I am happy to report that we are just as happy now with our fireplace as we were when we placed the order.  It is beautiful and looks, feels, and sounds just like a full stone fireplace.  Our neighbor asked if we had the stone imported from the fireplace and, while some might not be, I was proud to tell her of our great “internet buy”!
*Another site that makes and ships these is Old World Stoneworks, but we ended up not buying from them because we didn’t know anyone who had purchased one from them.
*After getting a comment about whether or not the bricks in the hearth came with the mantel I wanted to clarify.  We had a FireRock fireplace built in the house and that is where those bricks came from.  I asked the stonemason to lay those bricks in a herringbone pattern instead of the traditional brick joint pattern.  What came from Mantels Direct was the mantel and column supports, the stone facing surrounding the hearth opening, and the stone piece on the floor in front of the hearth.
*I was in no way compensated for this post and it falls under my link/review disclosures

House

Moving and Packing

We’re a few weeks in to unpacking at our new house and I figured that this was as good a time as any to share my moving and packing experiences.

While our house was on the market I spent some time scouring the internet (let’s be honest, Pinterest) for tips and tricks to make moving easier.  I knew with two little ones I would have to be organized to make it as easy as possible.  It turns out that moving is never going to be easy but you can make it a little less stressful with some planning.

– Rubber band all your silverware together and put in a clean plastic bag.  Pack it with the drawer divider.  This way when you unpack it, it’s all clean and ready to be used.

– Use a different color of construction paper or duct tape for each room in the house.  Label each room in the new house with this same color.  This makes it easier for the movers to be able to identify which rooms which boxes go in.  The listed contents also helps you to identify boxes that are the most important to be unpacked first (for instance, unpacking your daughter’s things before the guest room).

– Label boxes with contents.  Number these cards.  Take pictures of cards and keep a list on your computer.  This might be overkill for some (and definitely eats up packing time) but when you’re looking for one thing in particular, it helps to be able to quickly identify which box number that item (say, mixing bowls) is in and then find that particular box instead of opening all of your kitchen boxes and glancing through the contents until you find what you need.

– Have a medium sized box opened and pre-labeled with each bedroom for the last minute items that need to be packed up the morning of the move.  Have large trash bags in them for bagging clean linens and keeping them clean or keeping dirty linens away from clean.  This way you can just throw everything in the box and tape it up quickly and your box is already labeled.

– PURGE as you pack!  Be ruthless with your things.  If you’re keeping it because so-and-so gave it to you ten years ago but you’ve never used it, get rid of it.  If you think you might use it for a craft project later but it’s been sitting in your pantry for over a year, toss it.  If it’s only broken a little and you think you might be able to fix it, throw it away because if you haven’t found time to fix it yet, you’re not going to find time to fix it.  By purging as you pack it will leave you with less to put away at the new house.

– Utilize local donation services that will come to your house to haul away donations.  We used a rescue mission in our area that comes and gets furniture, clothes, etc.  They came three times during our packing and took everything from old lamps that still worked but weren’t in style to furniture pieces that no one had any use for anymore.

– Wear an apron as you are moving in and keep things like pens, small notepad, felt pads to put under furniture, and scissors or a box opener in it.  It’s so handy to have those things with you and the apron allows you to carry more than if you just put things in your pockets.

– Pack your plates with styrofoam plates from the dollar store in between them and then package the whole thing with bubble wrap.  This keeps your plates clean but protected and the styrofoam plates absorb some of the shock of moving.  We, thankfully, didn’t lose any plates and our large ones were packed this way.  Our smaller plates were just packed with bubble wrap between each layer (same concept). (Tip from The Frugal Girls)

– Gather pre-used boxes for your items.  Our moving company brought us all of the boxes that we could possibly need (for free!) since they typically move military families and pack and unpack all the families items.  Ask your company if they offer free boxes or a reduced rate on boxes.  You can also find boxes from places like your grocery store, a liquor store (perfect for glasses!), or a department store.  Most places can tell you when their truck gets unloaded and free boxes might be available.

– Have your kids help you pack and unpack their rooms (if they’re old enough).  Charlotte loved getting to pack her items in boxes and then unpack them later.  I think it helped her process the move better since she knew exactly where her “stuff” was at all times.

And probably the most useful tip….
– Get the ends of rolls of newsprint from your local paper to wrap things in.  Ours was giving them away since the printing department was moving to another area but I’ve heard that sometimes you have to purchase them.  These “leftover” ends enabled us to not buy any packing material for our boxes and the unprinted paper didn’t leave any yucky residue or printing on our items.

Some online resources that helped me in my moving planner were FlyLady Moving Tips, Passionate Homemaking Simple Moving Tips, Sherbet Blossom Project Organize,